So many of my projects have been built from scratch recently, but this one is a good old fashion Ikea Hack. Skip to reveal?
The base furniture piece is the "Besta" TV Console. My roommates and I had bought the base model long ago with the intention of modifying it somehow. Now, nearly a year later, I was going to finally give it some legs and doors.
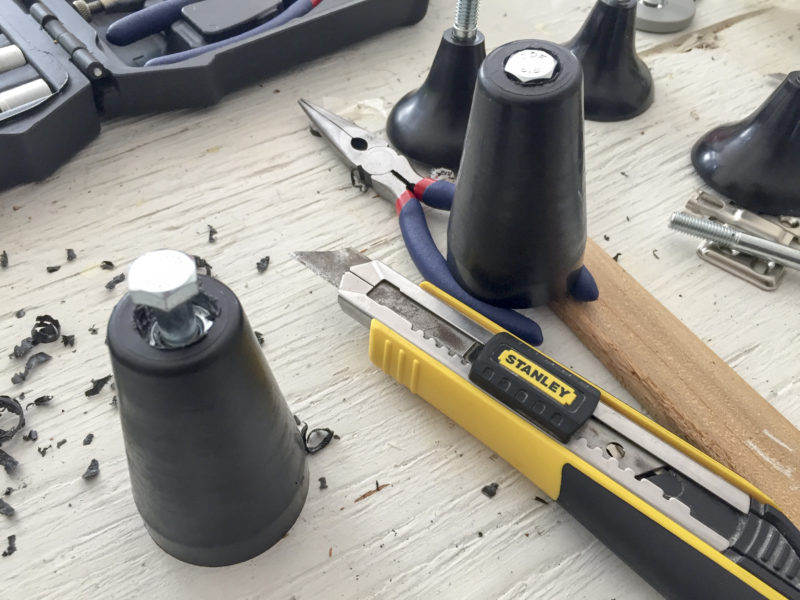
The hardest part about switching out the legs was getting hardware that would cooperate. I'd salvaged some plastic screw legs pulled from a bed base (probably also Ikea.) While the Besta had it's own feet, they didn't fit into the plastic cones. Instead I found a bolt that would thread into the inserts and replace the existing feet. This bolt head stuck out the bottom of the cones, so I carved out a big enough hole so that it would fit. All totaled, the 4 bolts took about 3 trips to 2 different hardware stores. To keep the bolt heads from scuffing up the floor, I applied a sticky felt pad to the bottom of each.


The doors were the real meat of this project, and I knew I wanted to try to make make them inset doors. Again, hardware proved to be a challenge, but I eventually found a European hinge that would work. A quick door mockup helped me confirm the offset needed to clear the side of the cabinet box when opening the cabinet, which I used to determine the size of the doors. This was an excellent opportunity (excuse) to test out my skill saw, and I must say it is leagues ahead of the clanky old craftsman that it replaced.
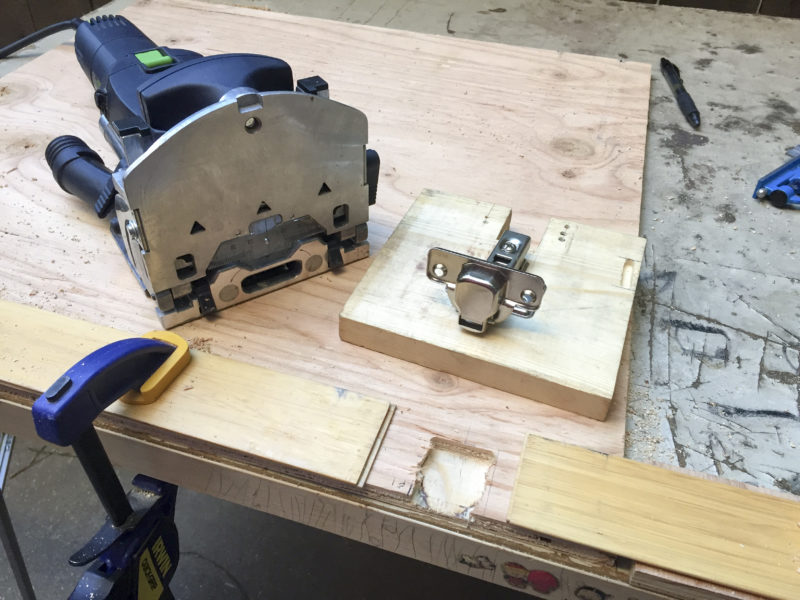
The trick with the flush mounting European hinges is that they require a recessed pocket for the hinge, and without a proper forstner bit, drilling jig, or router I was at a loss for the best way to make this. That's when I recalled I still had a borrowed Festool domino joiner. Since this works (very nearly) like a router, I realized I could set the height just right (with some shim help,) then do a series of "joints" to clear out the proper space. It worked surprisingly well!


At first my thought was to apply tiles or wall paper to the face of the wood to give it an interesting texture, but my mockup showed me why this wouldn't work. Because of how the hinge swings, there's a limit to the maximum thickness of the door face. Plan B was to stain the plywood and present it with a frame (everything looks better when it's framed.) I also happened to have found some abandoned aluminum frames on the side walk (probably also Ikea.) The corner hardware allows these to be pulled apart and cut down to size, which is just what I did. I encountered a problem when the hinges appeared to conflict with the back side of the frame. The only solution I could see was to carve that area away with an angle grinder. This was a hard thing to do with such a beefy tool. A dremel probably would have been ideal, but I gotta work with what I have.


Gluing the frame to the the wood was a little tricky from a clamping perspective, but I finally figured out a way to apply enough tension with an old bike inner tube (/giant rubber band.) Mounting was the final step. I was a little nervous that I'd cut the doors slightly too large, or mounted the hinges in not exactly the right spot, but the adjustment screws on the hinges came to my rescue.
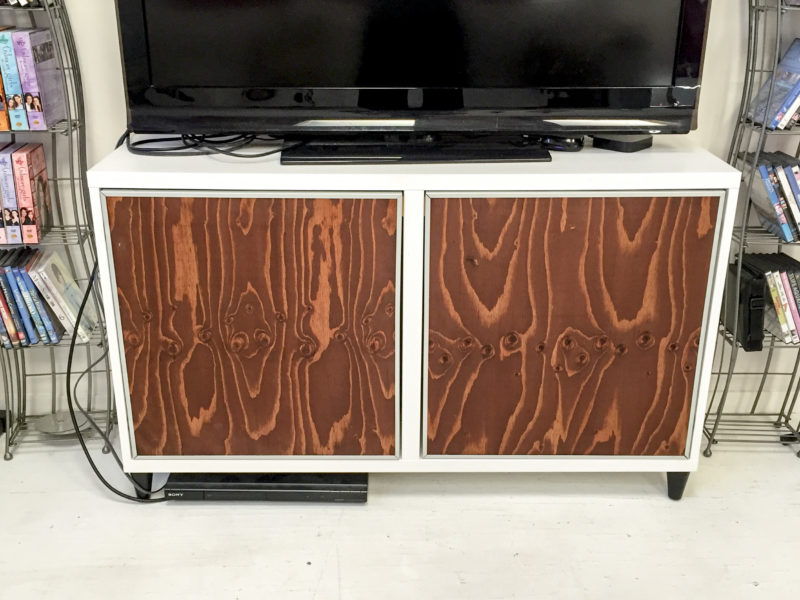
The final console looks pretty decent, although, I can definitely appreciate why inset cabinet doors are less ubiquitous than overlay. It's a lot easier to hide variations when there's not a border around the door. I'll probably get a good size paddle drill bit and put a hole in the back side of both cubbies for chords and such, but for the most part not too shabby.