All images and designs are copyrighted and not for use.
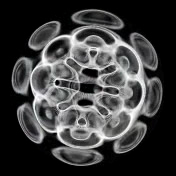
I'm working on a complex modeling project for a client right now, and decided to share how it's going. The goal is to crate a 3D interpretation of this image. The image was generated from the phenomena of "cymatics," when patterns in acoustical vibrations are captured by a thin layer of particles (usually sand.) There's a viral music video from about a year ago that really beautifully showcased the effect.
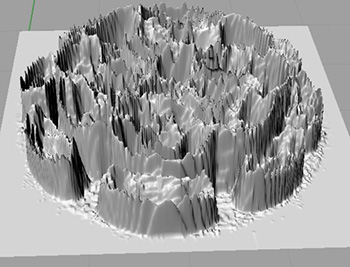 Initially, I had thought to use the same "height field" Processing script that I used to generate a series of Lithophanes, which takes the grey scale value of each pixel and uses it to control the height of the mesh at that point. My plan was to simply exaggerate the height of the output to make the otherwise flat panel take on some dimension. After converting the image to grey scale and running it through the script, here is the result.
 Unfortunately, that result isn't quite what I'm hoping for. For one thing, it makes the low resolution of the photo quite apparent (you can see individual pixel grids when you look closely. Plus the high points seem to have "mountain range" affect, creating the forms in jagged spiky lines. While certainly having a higher resolution photo would be the most ideal solution, I'm not sure it would smooth things out entirely, so I thought of a different approach.
The problem with the height field approach was that I was sampling a circular shape with a rectangular grid, and you know what they say about square pegs and round holes! To get around this, I needed a way to convert the image into vector data that would smooth over the shortcomings of the pixel grid, and the only method I know of for that is to use Illustrators "live trace" feature. A live trace recreates a raster image in vector by "tracing" paths around like-colored pixels (this is probably a simplification, but it's how I imagine it works.) By live tracing the image, essentially I'd be trying to create a topography map of tones used in the image. I could then export those vectors into Rhino and use them to create a surface from the topography, which would be smoother and more consistent than the height field.
There were many challenges to testing this solution.
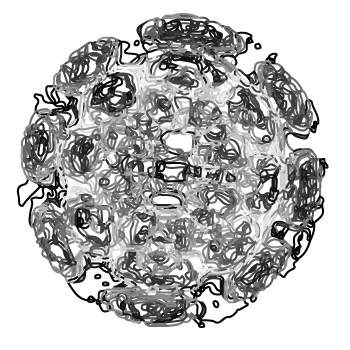 I had to find a way to transcribe the "height" value of each contour from Illustrator to Rhino. Test imports from Illustrator to Rhino showed the only non-vector information that was preserved was the layers and the display graphics. Rather than trying to wrangle hundreds of layers (I was planning on using as many contours as I could) I decided to reference the line color to elevate it for the topography.The next roadblock was that live traces doesn't create colored outlines, but instead it colors the fills based on the color it was tracing. I had to find an Illustrator script to automatically switch the fill and line colors of multiple shapes. The result is a tangled mess of overlapping lines, but hopefully spacing them out across elevations will untangle them some.
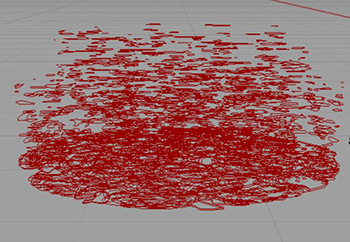 Once I moved into grasshopper I learned that it doesn't have built-in capabilities to read "Display Color" of input objects (in this case my colored topography lines.) Again, thankfully, someone online had made a small plugin to add this functionality. A few trial and error scripts later and I was successfully extruding my input curves to a variety of heights determined by their color. Unfortunately, my progress stops there. The resulting cloud of curves has proven way too complex for my computer to run a "patch" command on. I suspect one of the issues is that the curves resulting fom live trace overlap far too much, which would almost never happen in a true topography. I'll either try to fix that, or I'll return to the height field strategy and see if I can smooth the image out.
the cymatic image is produced on a surface , so if it had been 3d, that instant on the surface shows a section of the 3d object looked for.
What it is needed ,it may be a ultra speed camera and a compatible reproduction of the sound in order to have it monitored through its development. It look like a CAT radiography , where, instead of moving step by step the plane of photography , the frequency would be varied.